Sunday, August 22, 2010

RAISING THE UPPER DECK TIMBERS


MID-AUGUST

THE EXTERIOR:

Currenty the exterior is being covered with stucco. First the building is covered with 2" thick foam inuslation panels and then covered with chicken wire mesh. Then a primary coat of cement is applied. After a week to 10 days of curing, a second finish coat with pigment is added. The roof timbers (columns and posts and rafters) are up. We will be adding the purlins across the rafters soon. The sheet metal roofing will then be attached to the purlins. We hope to start the first floor deck this week. First we will layout the concrete pier locations and dig holes with an auger attachment on the Bob Cat. Then we insert the sono tube formwork in the hole and place the concrete. From there we will begin to frame the deck on top of the concrete footings.


THE INTERIOR:
All of the new walls have been plastered and painted. Some of the doors have been hung. This week the electricians will return and install all of the remaining light fixtures and electrical outlets. Ahhhh.... walls, doors and light fixtures. No more sleeping on the floor and using a flash light to find the bathroom. Living large!
We are having some difficulty getting our custom made exterior doors and our interior transoms.


This is a picture of the upper deck before we applied the Trex decking. This image shows the rubber roof applied on top of a solid roof that slopes 1/8" per foot toward the front of the building. At the front there is a trough that directs water to a down spout. On top of the rubber roof are tappered 2x joists. The top of these joists are level and the bottom follow the slope of the roof. Placed perpendicular on top of the tappered joists are 2x4 joist spaced 12" on center. Origianlly I had planned on making three sections of deck that could be lifted up independantly to inspect the rubber roof for leaks but when we changed the design from face screwed to hidden fastener, this was no longer possible.


ELLEN'S GARDEN GATE


Using the old cedar joists from the deck we demolished, I made a new gate for Ellen's garden. We used a cast iron fire place surround for the ornamental infill. I used one of the fireplace surrounds feet as the handle. The arch on the top is made from two prongs off an old hay raking machine. It was Ellen's idea to weld them together to form an arch.

Thursday, July 22, 2010

MY NEW NEIGHBORS


This is my new home until we get the interior walls covered with sheet rock and plaster. My first night camping out Julie, my dog, decided to go off hunting while I slipped into bed. The sky was beautiful with a partial moon glowing behind a couple of clouds. Other than a couple of clouds I could see the night stars. Here it is so dark at night you can see the Milky Way. This is beautiful I thought to my self as I settled into bed. Then I heard a growl in the darkness. It was not a dog growl. I thought Julie must be out there harassing some critter so I called her into the tent. A short time later I heard another growl somewhere near my tent. Julie lifted her head with her ears erect but did not bark or move. This freaked me out a little and I could not fall a sleep. So I took my flash light and dog and went in doors.
The next day I told my sister Ellen, her husband Wade and his brother Stan the story of what had happened. They all laughed and said it was probably a bull frog. Stan amused himself by plopping his loaded 38 special on the table in front of me and said "here, take this".
Two days later as we returned from dinner we came across the next door neighbor and we stopped to say hello. She asked if we had seen the bears. "Where?" we all asked. She pointed and said "in my backyard. Up the hill." She was pointing in the direction of my campsite. I smacked Wade in the back of the head and said "Ha!"
It is Monsoon season and my temporary roof patch at the junction of the existing house and the addition leaked like a sieve. Until I can get the roofer in to install the permanent roof, I can not have the interior walls sheet rocked. The roof is my first priority.

Saturday, June 26, 2010

WE GOT WOOD UP


The steel connectors we had fabricated by an old friend of Ellen and Wade's. He used steel plate recovered from a mine in Rico. The steel still bears the marking of corrosive chemicals used in the mining process. Unfortunately the geometry of the steel brackets was highly irregular. In addition to the timber being rough milled and not square, the bolt holes did not align. This made it very difficult to get the 3/4" through bolts to work. It also made the process of recessing the metal connector to the timber very difficult. We had the metal connectors sand blasted and powder coated at a local shop and they did a good job. It turns out they also do metal fabrication. I will have them bid on the connectors for the upper timber framing. If it works out I will use them for the metal exterior stair.


The first beam and column section we prefabricated and it went up easily. The second set we had to cut the beam length after we raised the two corresponding columns. This meant we had to carve and drill the beam end to fit while the crane operator waited. It was stressful to work while someones meter was running.


With the last beam in place it was time to load the S.I.P.s roof panels up onto the existing roof. We will put them onto the tops of the new beams in the future.


EXTERIOR WALL DEMOLITION


This is the South facing wall before we removed it.


After.


It was a record breaking 100 degree day. In the high altitude sun with dust, insulation and mouse turds, it was a hard days work.
Ellen and Wade's bedroom just became bigger.
The next day it rained quite a bit and then it hailed. The temperature dropped to 40 degrees. Spring time in the South-West.

NEW LOAD BEARING EXTERIOR WALL


This is the framed opening for the pocket door. The pocket doors are six feet wide. This requires an opening of 12', three feet on either side for the pocket doors to slide into. The beam at the top is three 11-7/8" by 1-7/8" micro lams nailed together. They are supported by posts on either side made up of four 2x8 ganged together.


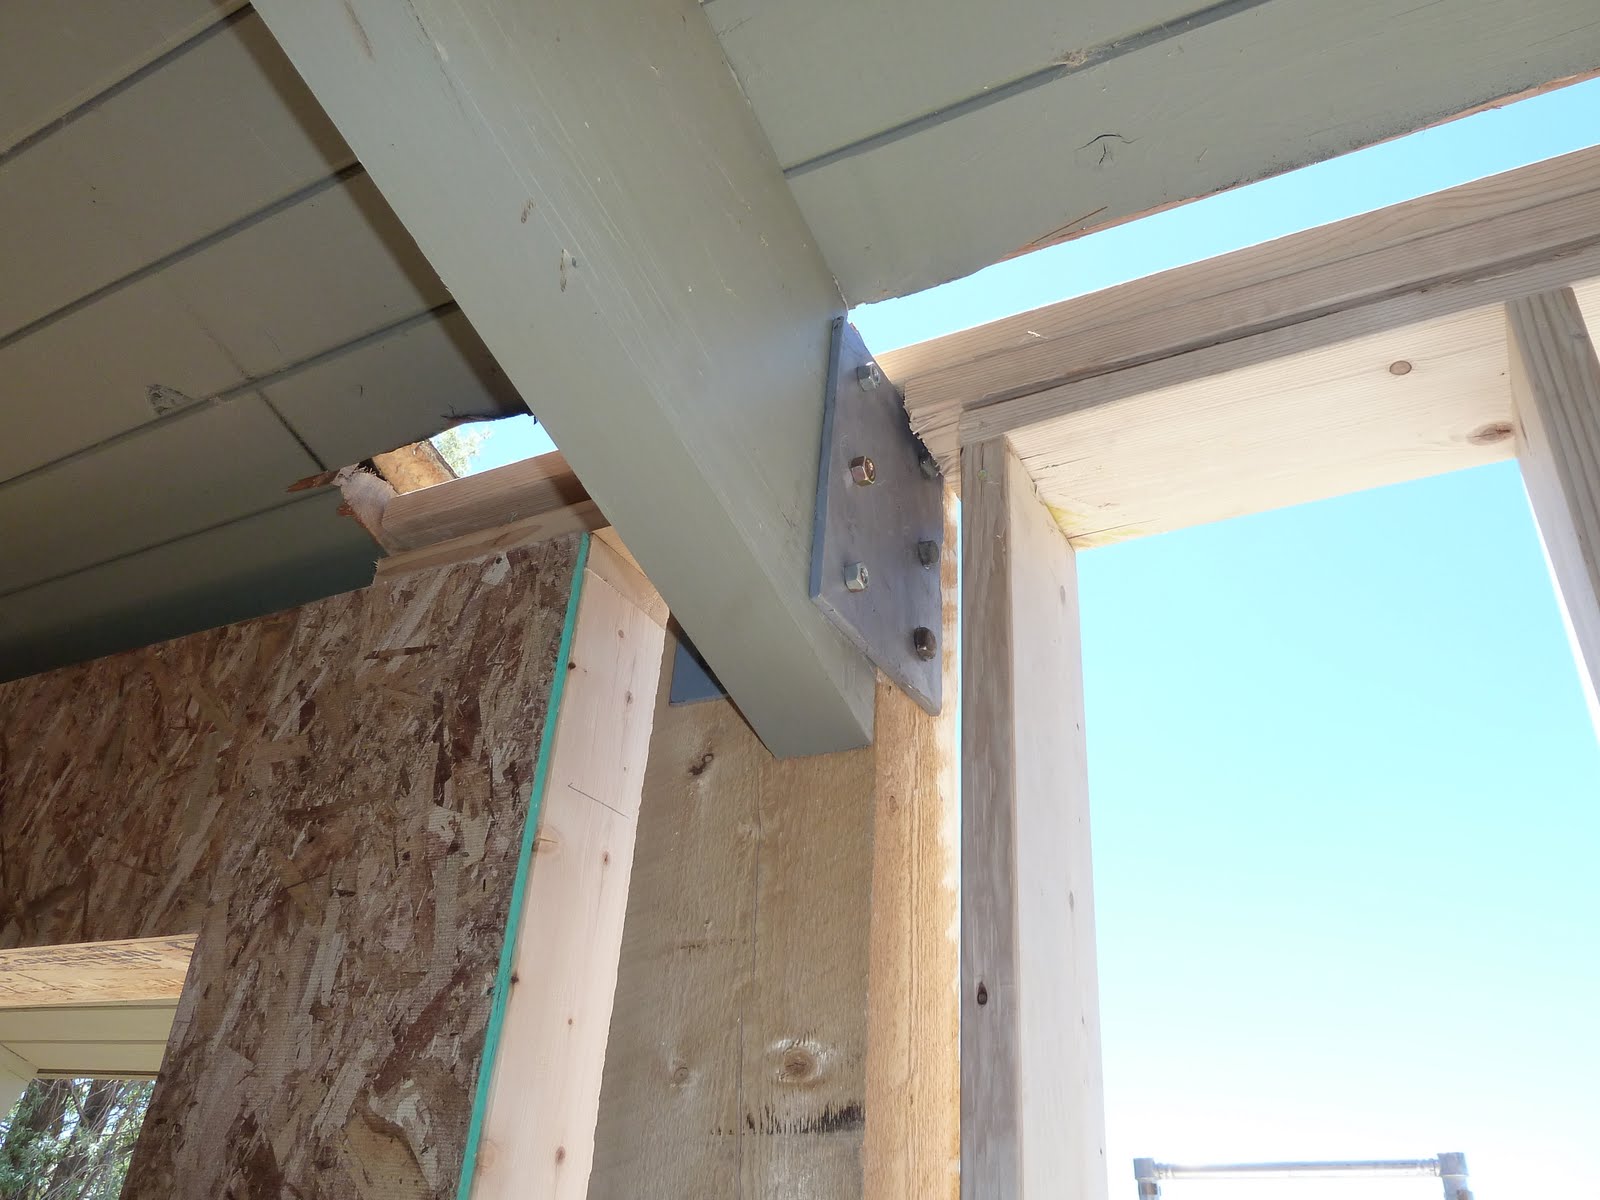
Photo #2 shows the entire framing and a section of Structural Insulated Panels to the right which form the entire new structural bearing exterior wall.


Photo #3 shows the connection between the existing glulam rafters and the new exterior wall. We made our own metal brackets using the steel door and window lintels left over from demolishing the brick exterior. In this photo, you can see the original exterior wall to the left before demolition.


Photo #4 shows another connector that we fabricated.
Photo #5. Now that the new load bearing wall has been built, the old one can now be demolished.